
In preparation for the Infinity Spring Challenge, I played the ITS mission Beacon Race with my Shasvastii sectorial against Lee’s Aleph. The practice was definitely needed as the Beacon Race mission is less straight forward then we both thought, indeed completing the mission within 3 turns proved to be very tricky! You can read the exact mission details here.
Mission Overview
The mission requires both players to reach a beacon generator located within an objective room within the center of the table. The objective room has four doors. The doors start closed, but once one is opened (with a wip roll) they all opened. Once the beacon generator is reached a beacon can be produced. The beacon then has to be moved to a security zone. There are two security zones per player. A security zone is located on the left and right flank of each player’s deployment zone. See the map below for more information.
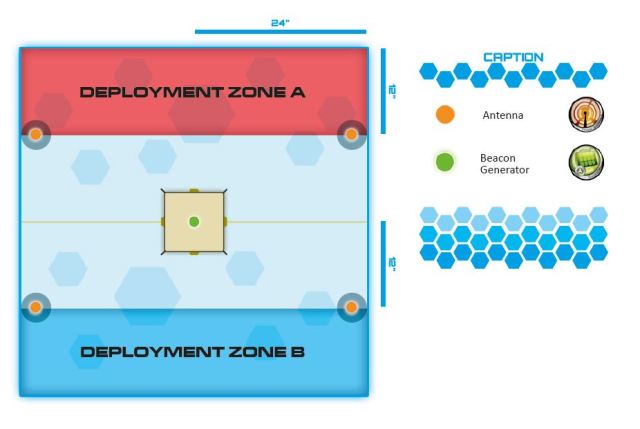
Beacon Race Map
Army Lists
300pts Shasvastii List
300pts Aleph List
Game Overview
The game started with Shasvastii winning the initiative and decided to opt for deployment and choosing to deploy second, as well as taking their pick of table side. The Aleph then decided to go first.

Shasvastii Deployment
Aleph Turn 1
The Aleph wasted no time in securing the objective. A Dakini (paramedic) ran up to the nearest door on the objective room and, on it’s second attempt, successfully opened all of the objective room doors. This allowed a sneaky Naga into the objective room, who promptly started laying mines. However with all the doors opened the Naga eventually moved into the path of a Q-Drone. With a HMG and total reaction the Q-Drone gunned the Naga down. However being dogged the brave Naga continued and left three mines within the objective room. The reminder of the Aleph force moves up in preparation to grab a beacon in the following turns.

Aleph Deployment
Shasvastii Turn 1
The Shasvastii went out for blood (or at least robot innards!) as a Q-Drone opened up on a Dikini with HMG. The firefight saw the Dakini taking several hits and falling to the ground inactive. With the Dakini with HMG out of the way the Maligons with sniper rifle revealed itself from Hidden Deployment. The Malignos shoot into a Deva, causing one wound. The Deva remained alive thanks to No Wound Incapacitation and elected to fail it’s guts roll and fall back behind cover, avoiding any more fire. The Maligons then moved into position to shoot another Deva. Once again the Malignos caused a wound and the the Deva fell back and out of line of sight.
The Shasvastii had inflicted some damage to the Aleph, but were highly concerned about the mines that the Naga had left within the objective room. Being Shasvastii (i.e. sneaky and spineless!) they sent a Slave Drone into the objective room. As the drone was synced with the Med Tech (a doctor and engineer model!) the Slave Drone was able to attempt to deactivate mines. The nearest mine was deactivated by the Slave Drone, however one of the remaining mines exploded, revealing itself to be a mono-filament mine! Instead of just exploding, the mono-filament mine leaves a template sized area which causes damage to any model that touches it! The mono-filament mine cut off safe passage into two of the four doors into the objective room, including the door nearest to the Shasvastii. As such the mono-filament mine was perfectly hindering the Shasvastii’s ability to reach the Beacon Generator. The Shasvastii decided to get rid of the last mine within the room, hoping to avoid a situation where the last remaining door to the objective room would be on the Aleph side of the table. The Med Tech moved into line of sight with the remaining mine and successfully detected it (mines are deployed as camo markers). Unfortunately the Med Tech failed to notice a Dakini off in the distance, which although at over 24″ away (-6 to hit with a combi-rifle) managed to kill the Med Tech for it’s devious efforts. As the mine was revealed the Shasvastii now has to take it out. In order to do so the Maligos used it’s powerful combi-sniper rifle to blast the cursed device, removing it from the game. The Maligos then went prone, happy with the damage he has caused this turn.

Malignos on the prowl
Aleph Turn 2
The Aleph had suffered some damage, but were still in a good position due to the mono mine cutting off two of the objective room doors to the beacon generator. The Aleph sent a Deva hacker into the objective room and managed to create a beacon. The Deva then proceeded to retreat with the beacon into the Aleph deployment zone, being careful to avoid any Shasvastii retaliation fire. The rest of the Aleph moved up into behind the objective room and into position to protect the Deva hacker. The Aleph also placed a Deva Bot near the Malignos with snipper rifle, so that if the Malignos stood up (he was currently prone) he would take the brunt of a heavy flame thrower!

Deva hacker and Asura
Shasvastii Turn 2
The Shasvastii needed to make a move for the objective, as the Aleph were almost certain to get their beacon into the security zone in their next turn. A Shrouded (forward observer) moved around to the objective room door, not blocked off by the mono mines, and proceeded to the beacon generator. The Shrouded managed to generate a beacon and started to retreat back towards the Shasvastii security zone. The Shrouded was unopposed and managed to score vital objective points for the Shasvastii. However it was clear that this lead would be very short lived, as the Deva hacker was poised to place a beacon within the Aleph’s own security zone. As such the Shasvastii moved Hasht (the best specialist they had on the table) up to the objective room in anticipation of the final third turn.
Aleph Turn 3
As expected the Deva hacker placed a beacon into the security zone. This put the score at one beacon for each player. However after spending so many orders moving the Deva Hacker, the Aleph did not have sufficient orders to move a specialist into the objective room and then attempt to get the beacon to the security zone again. The rest of the turn saw a Deva and Asura move up to the objective room door on the Aleph side of the table, ready to attack any Shasvastii who tried to grab a beacon on the last turn of the game!
Shasvastii Turn 3
The Shasvastii had to make the most of thier last turn and attempt to get a beacon, at any cost. Luckily they had the right Shasvastii to do the job, Hasht! Hasht moved into the Objective room taking incoming fire from the Deva and Asura. Hast manged to doge many of the shoots, whilst his armor and nano-shield absorbed the rest. However by the time Hast had collected a beacon and moved from the room he had suffered a wound. Thankfully Hast has no-wound incapacitation, so was able to continue despite the damage. Hast then retreat to the Shasvastii security zone and place the all important beacon within it!
“I am a Corash. They will not present an obstacle, I will not present a fair fight.” Attributed to Corax Hasht
After Game Thoughts
The Shasvastii (very) narrowly succeed in getting more beacons into their security zone, winning the game. After the game me and my opponent agreed that he should of set up a suppressive fire onto the door that Hasht had to move through. This would have made it much more tricky for Hasht to reach the beacon generator. However we were trying to wind the game up, so rushed the last turn a bit. Still it’s a lesson learnt for another game!
Beacon race is certainly an interesting mission. For one, most of the action is centered around the objective room and secondly completing the primary objective is incredibly order intensive! In fact the game saw very little combat, as so many orders are needed to move up to the beacon generator, generate a beacon and then get the beacon to the security zone.

Aswangs – Hiding away like a good Shasvastii should!
Interestingly The mission does not require many specialist, as you can pass the beacon to another model once they are created. So having fast models within your army is highly valuable within this mission. Having models in your list with mines, as well as other deployable weapon such as Crazy Kolas, is also a distinct advantage. To counter this, minesweepers would be very useful. In addition including models with smoke grenades would be a great way to allow friendly specialist to reach the beacon generator, unless of course the opponent has Multispectral Visor level 2 or 3.
Beacon race is an interesting mix of defending the objective room whilst obtaining beacons and getting them into your own security zone. Personally I think this mission will often result in a draw, as I thin it would be easy to have a stand off around the objective room. Because of this and because of hoe how deadly certain deployable weapons become, beacon race is not one of my favorite ITS mission. It does however bring something diffrent to the game, so I will just have to keep practicing this mission!
